Automating a 3-Way Switch with Shelly + Home Assistant: Part 1 — Wiring
I had replaced my plain old bulbs with WiZ light bulbs in my hallway. The bulbs were originally controlled by a gang of 5 switches. Initially I had replaced the 1st and last switches with tp-link Kasa HS210 3-way smart switches. This was fine until I wanted to add a motion sensor and also change the bulbs’ settings (change mode based on time of day etc). It turns out controlling smart bulbs with smart switches is not a good idea — one can’t change bulb settings when not powered, and changing them while powered creates delay; moreover the automation logic gets complicated. The better option is plain old switches with a smart relay between them and the light bulbs. The key is to decouple the switch and the power to the light bulbs and have the switch(es) be inputs to the automation. This allows the light bulbs to be constantly powered and controlled by the switch(es) and other smart controls.
Shelly 1 (I have the gen. 1) is a perfect fit for what I wanted to achieve. I replaced the smart switches with plain old 3-way ones (I did initially leave them in, but it’s overkill I think) and added the Shelly 1 between the end switch and the light bulbs.
Wiring
WARNING: Please be careful if you plan to do this on your own — playing with electricity is very dangerous. Always turn off power at the panel before attempting anything, and ensure all connections are secure and tidy. It’s advisable to ask a certified electrician to help.
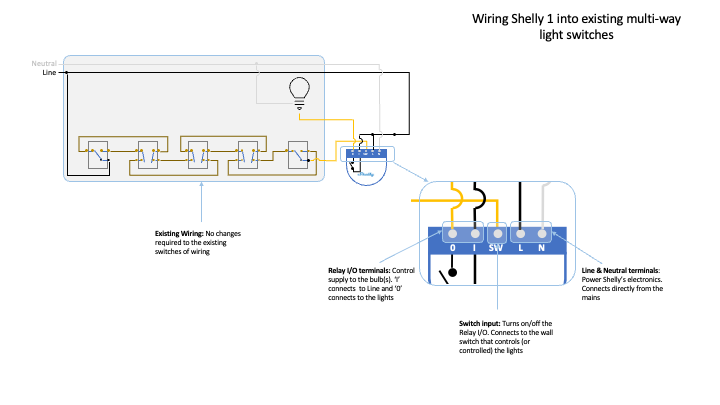
Shelly 1 has 5 terminals. The Line and Neutral terminals power the internal electronics and need to be connected at all times. This requires that there are line and neutral wires coming in to the junction box where the Shelly 1 is to be installed. In many cases there may only be the traveler and the load wires in the junction box, as was the case with mine. I had to splice and fish the line and neutral wires from a nearby wall socket, but you may have better luck! I disconnected the load wire from the 3-way switch (typically connected to the black terminal/screw in the US) and connected it to the O terminal on Shelly 1. I connected a wire between the switch’s load terminal (the black one) and Shelly SW terminal. Finally I connected the I and L terminals to the line wire I had fished and then N to the neutral wire I had fished.
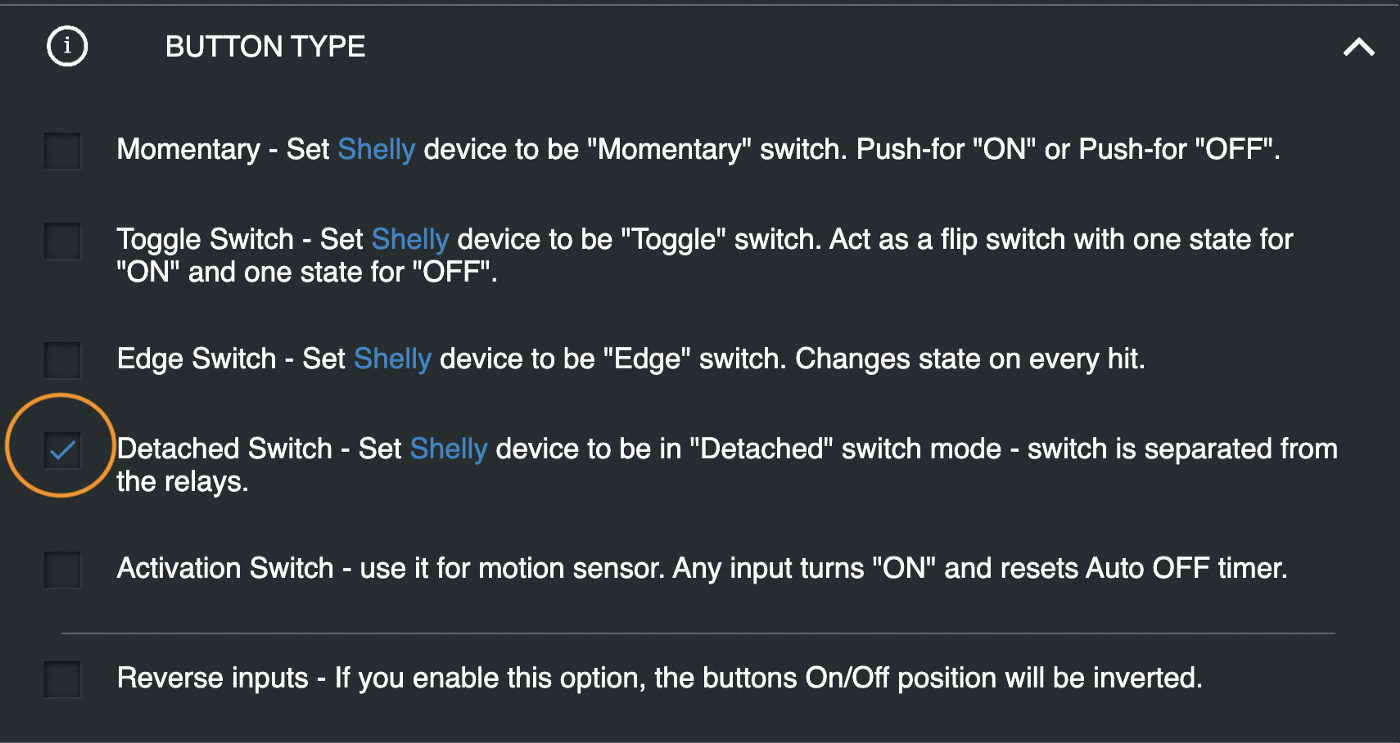
The way this works is that there is a relay between I & O terminals, and this relay is controlled by Shelly 1’s electronics based on software commands or the SW terminal. The default mode of operation has the SW terminal logically connected to the relay control, meaning the switch directly controls the power to the light bulbs connected to Shelly 1. This can be overridden by setting the button setting in Shelly 1 to “detached.”
Configuration
I used the Shelly app on my iPhone to discover and set up the Shelly 1. Pretty straightforward. I typically assign a static address to all my WiFi smart home devices — this allows me to group and manage them better; I did this from my UDM console. I did the rest of the setup using the browser.
The important setting change I made was to set SETTINGS > BUTTON TYPE to Detached Switch.
Changed the name and set cloud mode off, but these are optional. Left the rest of it as-is.
Loading comments…